When you start building a website, it is important to use a structure that is suited for your content with the optimal impact on your visitors.
For each domain, there are certain best practices that are generally accepted by developers. One such rule for news, magazine and other related types of sites, is to display featured posts at the top of the page using large images and big, bold titles. This type of feature is covered in the theme by grids and blocks that come in multiple formats and color styles.
This guide will show you how to use and set the theme’s available grids and blocks. Each block can be added to the page using the tagDiv Composer plugin.
How to access the block settings area:
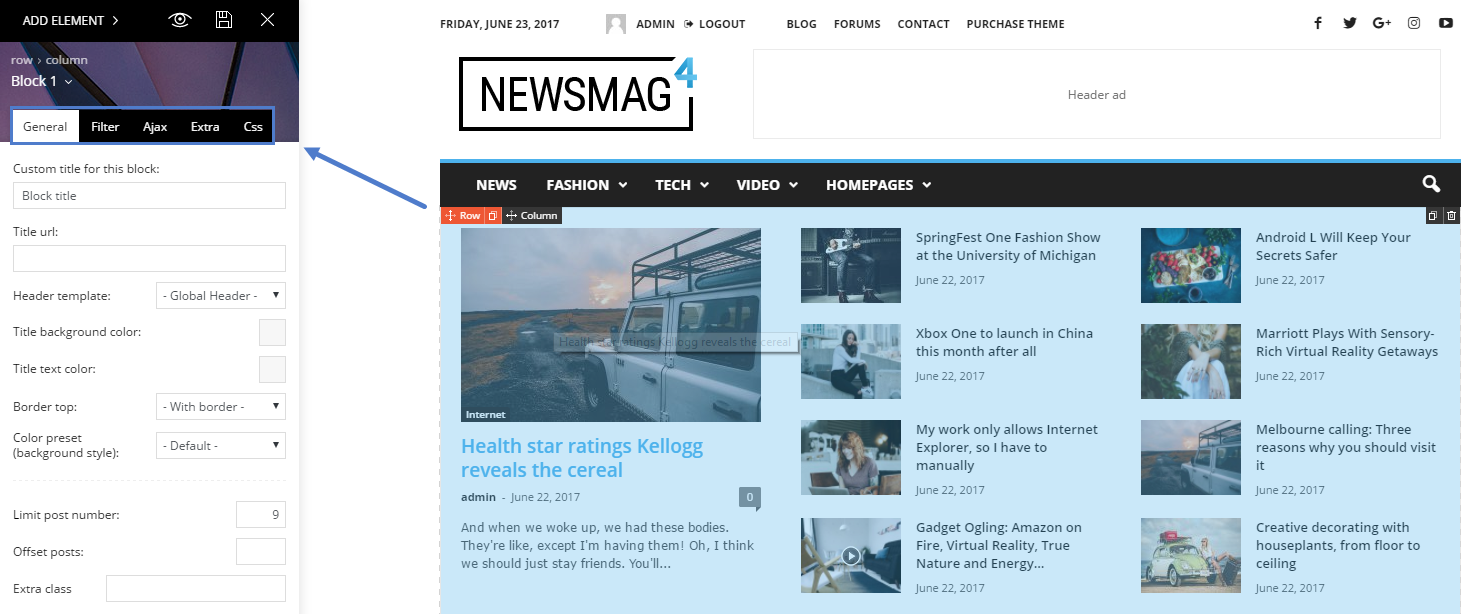
To access the block settings while using the tagDiv Composer plugin, you just have to click on the block area, and the block settings window will automatically appear in the tagDiv Composer panel on the left. For a better accessibility, the settings are divided into sections (tabs) like General, Filter, Ajax, Extra or CSS.
Big Grid Settings
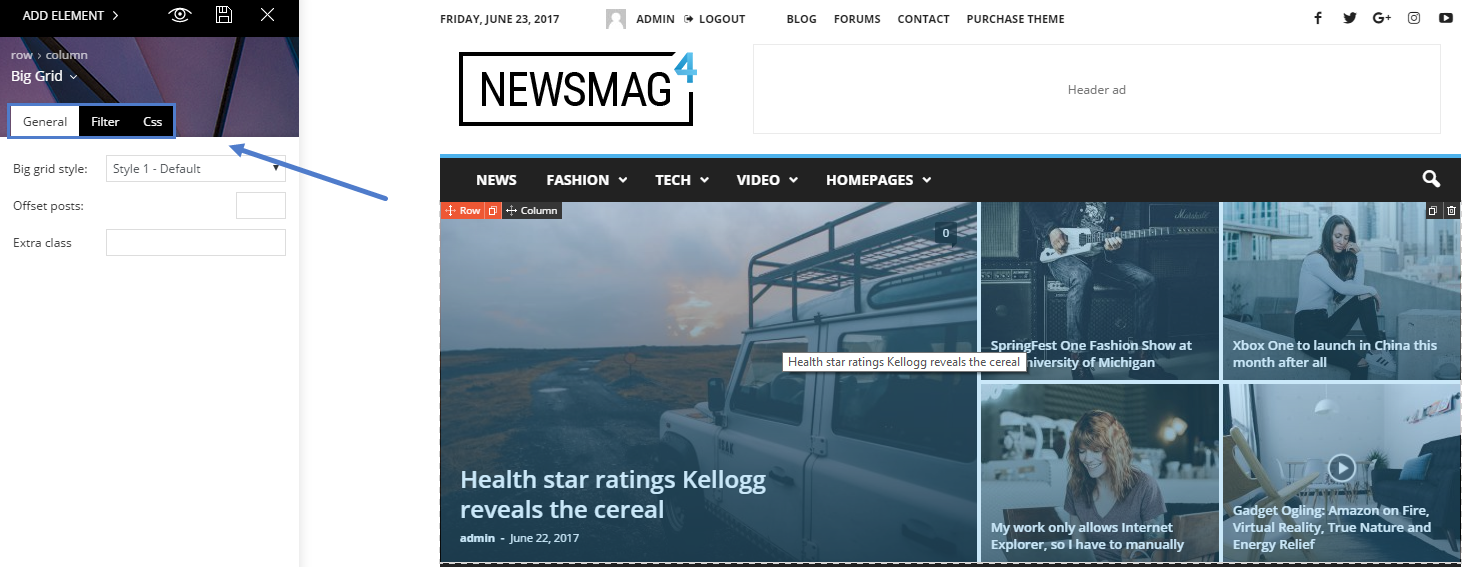
All available Big Grids blocks have 3 Settings Tabs (General, Filter, and CSS) from where you can customize them.
1. General Tab:
- Big Grid style – Each Big Grid comes with different styles. This option will change the appearance of the grid.
- Offset posts – Start the count with an offset for the posts that will be displayed on the grid. If you have a block that shows five posts before this one, you can make this one start from the 6’th post (by using offset 5). This means you can make the Big Grid jump over a set number of posts to avoid duplication.
- Extra class – This input field can be used to add a particular and/or unique class for your grid, which can be used to add additional customizations to the grid.
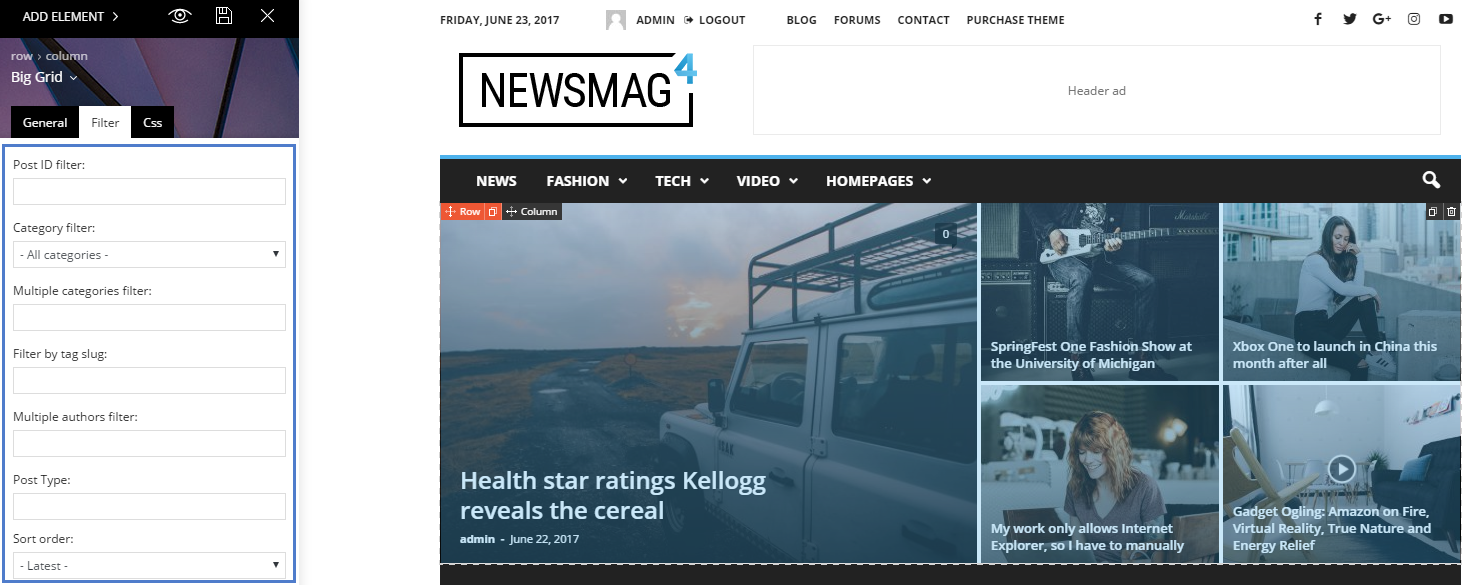
2. Filter Tab:
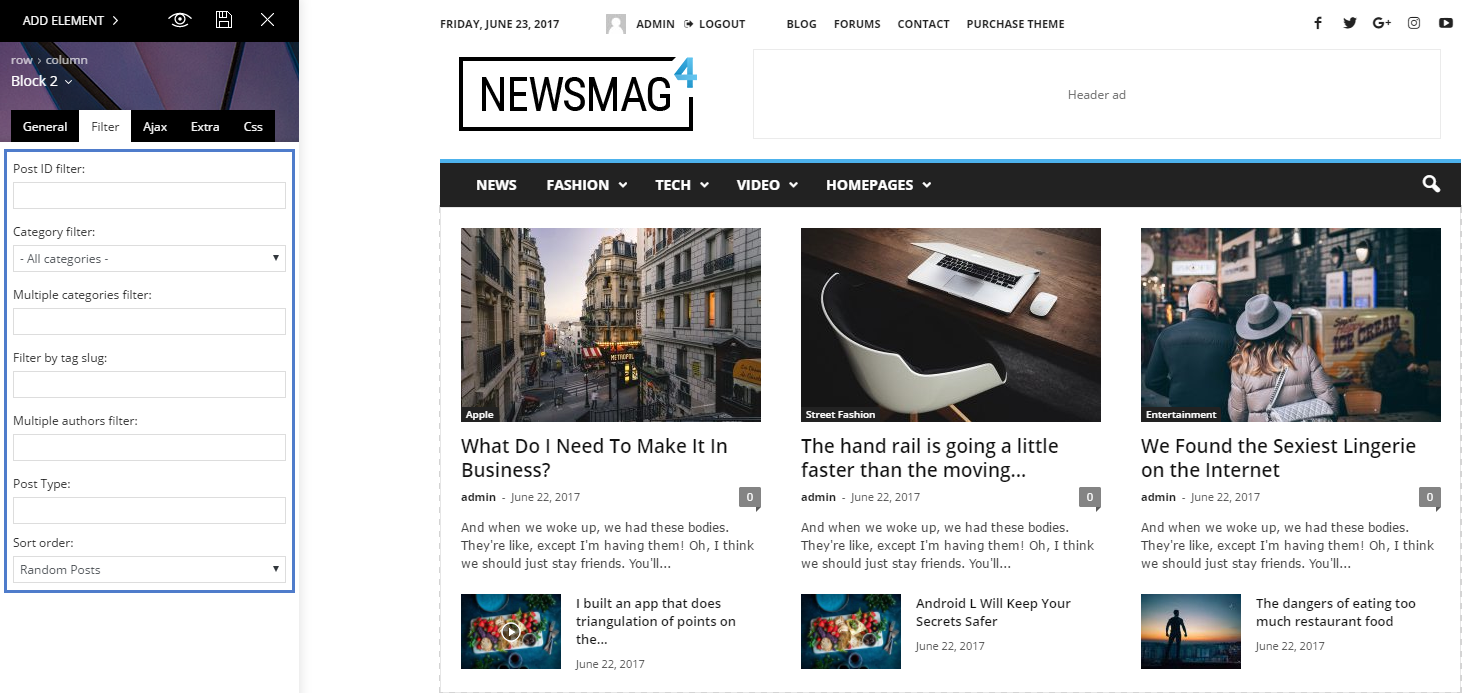
Filter in-depth by using individual Posts IDs, Categories, Tags, Authors, Post Types that you want to display on the Big Grid, and a variety of custom sort order options.
Category filter – Choose a category for the block from a drop-down menu containing all the existing categories.
- Sort order – This option lets you order the posts inside the grid. Most of these options are self-explanatory, but there are a few options that have requirements:
- Standard sorting options:
- Latest posts – It will show posts from newest to oldest.
- Oldest posts – It is the reverse of the previous sorting option.
- Alphabetical A > Z – Your posts will be sorted by their name in an alphabetical order.
- Random posts – This sorting option will bring posts up randomly on each loading of the page. Every time you refresh the page, there will be different posts displayed. As a note: do not use the random posts sorting options together with pagination, as it could result in duplicate posts.
- Random posts from the last 7 days – This field will bring up random posts based on the posts published added in the last 7 days.
- Sorting options that feature extra requirements:
- Popular (all time) – this sorting option will require the post views to be active. If views are disabled, these options will not work.
- Popular (last 7 days) – you have to enable the 7 days post sorting from the Theme Panel > Block Settings > 7 Days Post Sorting
- Popular (jetpack + stats module required) – Does not work with other settings/pagination, and it requires the Jetpack – Stats Module to be installed.
- Featured – it displays posts included in the Featured category which is automatically created by the theme. If you delete this category and you want to restore it, create a new category with the name ‘Featured’ and a ‘featured’ slug.
- Random posts today – this field will require the post views to be active.
- Highest rated – requires review posts. To see how you can set a review, please check the following guide.
- Most commented – requires comments to be active on posts. You can enable/disable the comments from the Theme Panel > Post Settings > Post and Custom Post Types.
- Standard sorting options:
- Post ID filter – Specific posts can be filtered to your block by using the post ID. You can get the post IDs by accessing the Wp-Admin > Posts section, hover the post title and check the link displayed in the browser’s left-bottom area. The IDs can be extracted from this URL. In order to exclude posts from a Big grid, just add a ‘-’ symbol in front of each ID.
- Multiple categories filter – This option allows you to filter the posts by multiple categories.
The procedure is similar to the one used on Post ID filter. Add the category IDs separated by commas (ex: 13,23,18). If you want to exclude categories, just add a ‘-’ symbol in front of each ID. If you want to display posts from a category and remove the posts included in one of its sub-categories, first add the parent category’s ID (ex. Fashion category: 341) and after it, place the sub-category’s ID (ex. Daily subcategory id: 342) with a ‘-’ symbol in front, like it’s shown in the image. If you decide to use the ‘multiple categories filter’, the standard Category Filter will be ignored. - Filter by tag slug – Filter the grid posts by their labels and enter the tag slugs separated by commas (ex: tag1, tag2, tag3).
- Multiple authors filter – This allows you to filter the posts by author(s). Enter the author IDs separated by commas (ex: 13,23,18).
- Post type – Use this filter if you want to display custom post types. Add the name of the post type. This is provided by the plugin used to create the CPT, or by the user if it’s custom-made. Usage: post, page, event – write 1 or more post types delimited by commas.
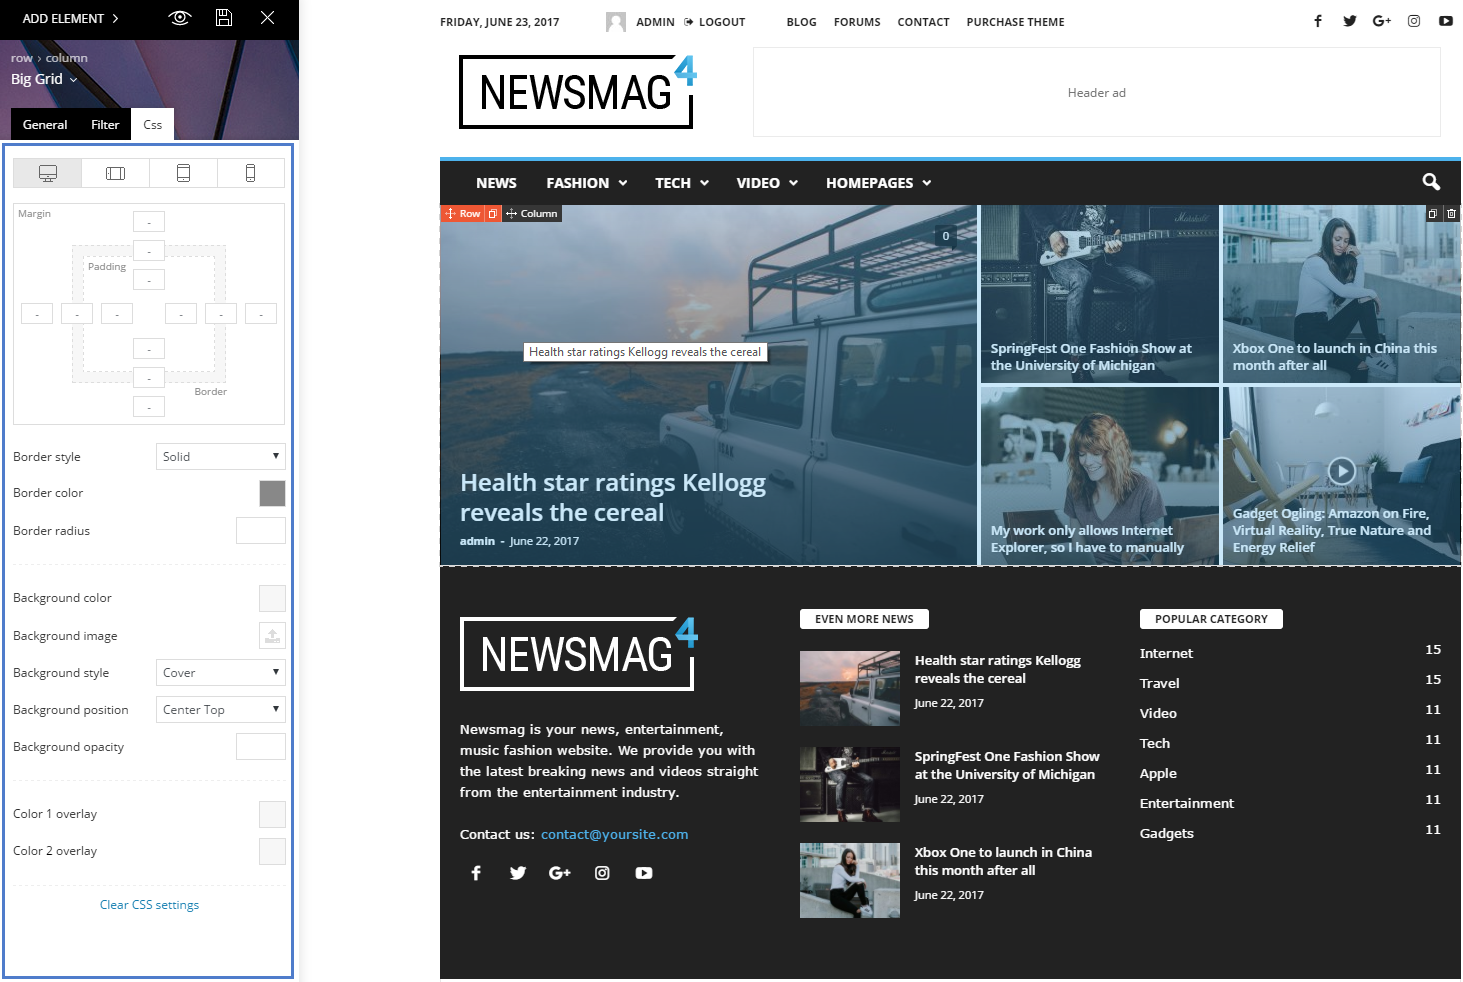
3. CSS Tab:
The CSS tab provides multiple design options and grants you the possibility to customize the grid. There are plenty of options for changing visual aspects, like border style/width/color/radius, adding margins/padding or customizing the grid’s background color/style, or just add an image as a background for your grid block.
Block Settings
All blocks have 5 Settings Tabs where you can customize them from.
1. General Tab:
- Block title (optional) – Set a title for this block. If you leave it blank, the block will not display any title.
- Title text URL (optional) – Set a custom URL for the block title.
- Title text color (optional) – Choose a custom title text color.
- Title background color (optional) – Choose a custom title background color for this block. The title background color also affects the hover color of the posts displayed, as well as the Ajax filter’s hover color.
- Limit post number – If the field is empty, the limit post number will be the number from WordPress Settings > Reading
- Offset posts – Start the count with an offset. If you have a block that shows five posts before this one, you can make this one start from the 6’th post (by using offset 5)
- Extra class – This input field can be used to add a specific and/or unique class for your block, which can be used to add additional customizations to the block.
2. Filter Tab:
- Category Filter – Choose a specific category for the block from a drop-down menu containing all the existing categories.
- Sort order – This option lets you order the posts inside the grid. Most of these options are self-explanatory, but there are a few options that have requirements:
- Popular (all time), or the ‘random posts from the last 7 days’ will require the post views to be active. If views are disabled, these options will not work.
- Popular (jetpack + stats module required) – Does not work with other settings/pagination, and it requires the Jetpack – Stats Module to be installed.
- Popular (last 7 days) – you have to enable this feature from theTheme Panel > Block Settings > 7 Days Post Sorting
- Featured – it displays posts included in the Featured category which is automatically created by the theme. If you delete this category and you want to restore it, just create a new category with the name ‘Featured’ and a ‘featured’ slug.
- Highest rated (reviews) – requires review posts. To see how you can set a review, please check the following.
- Most commented – requires comments to be active on posts. You can enable/disable the comments from Theme Panel > Post Settings > Post and Custom Post Types.
- Post ID filter – Specific posts can be filtered to your block by using the post ID. You can get the post ID by accessing the Wp-Admin > Posts section, hover the post title and check the link displayed in the browser’s left-bottom area. The IDs can be extracted from this URL. In order to exclude posts from a Big grid, just add a ‘-’ symbol in front of each ID.
- Multiple categories filter – This option allows you to filter the posts by multiple categories.
The procedure is similar to the one used on Post ID filter. Add the category IDs separated by commas (ex: 13,23,18). If you want to exclude categories, just add a ‘-’ symbol in front of each ID. If you want to display posts from a category and remove the posts included in one of its sub-categories, first add the parent category’s ID (ex. Fashion category: 341) and after it, place the sub-category ID (ex. Daily subcategory id: 342) with a ‘-’ symbol in front, like it’s shown in the image. If you decide to use the ‘multiple categories filter’, the standard Category Filter will be ignored. - Filter by tag slug – Filter the grid posts by their tags, and enter the tag slugs separated by commas (ex: tag1, tag2, tag3).
- Multiple authors filter – This allows you to filter the posts by author(s). Enter the authors’ IDs separated by commas (ex: 13,23,18).
- Post type – Use this filter if you want to display custom post types. Add the name of the post type. This is provided by the plugin used to create the CPT, or by the user if it’s custom-made. Usage: post, page, event – write 1 or more post types, delimited by commas.
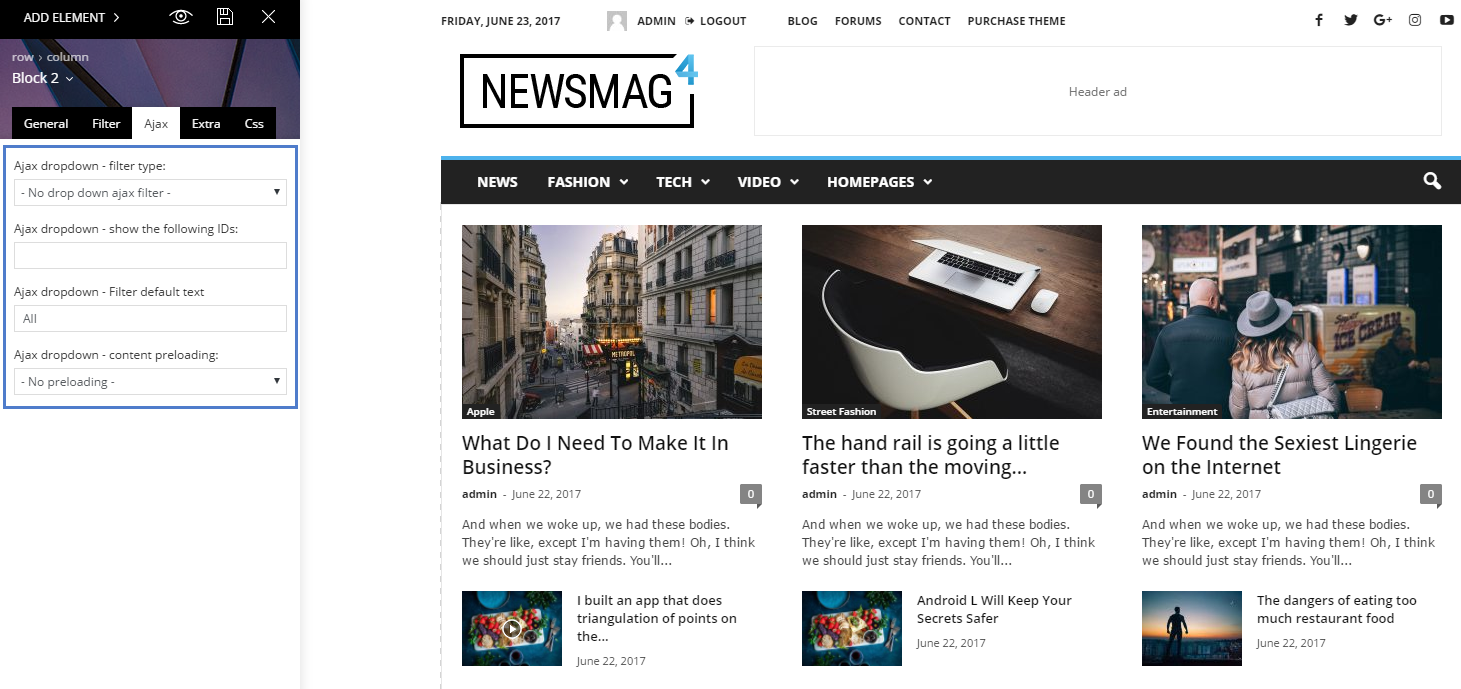
3. Ajax Tab:
- Filter type – Display a list of Categories, Authors or Tags next to the title. The user will be able to see posts filtered on this block, that will be dynamically loaded with Ajax, without leaving the page. The Ajax filters (except by popularity) require an additional parameter.
- Show the following IDs – the Ajax drop-down shows only the author IDs, categories IDs or tag IDs that you enter here, separated by commas. If no IDs are provided in the input below, the filter will show all the available items (ex: all authors, all categories etc.)
- Filter default text – lets you choose the name for the first item from the drop-down Ajax list. By default, this is named ‘All’.
- Content preloading – When the preloading section is active, the theme will load the first page content for each of the Ajax filters at the initial page load.
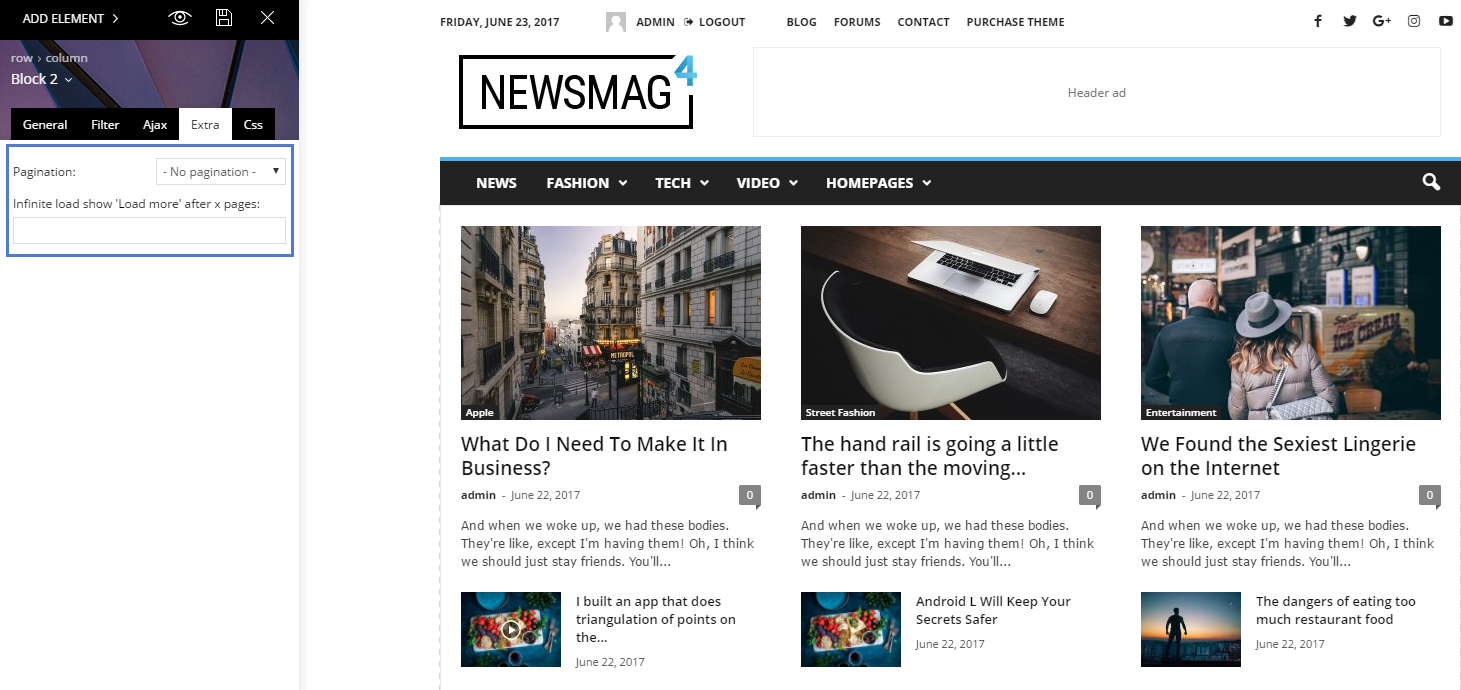
4. Extra Tab:
- Pagination – You can choose to add pagination to your block.
- Next Prev ajax – adds two navigation arrows that can be used to navigate through posts
- Load More button – the “Load more” button appears at the block’s bottom, allowing users to load more posts
- Infinite Load – automatically loads more posts when the user gets to the end of the post list displayed by the block
- Infinite load show ‘Load more’ after x pages – if you select the infinite load you can use this option to make it stop after a number of pages. The “Load more” button will appear at the page’s bottom allowing users to load more posts. Notice: For the Infinite Load you will need to specify after how many pages a button will show up, otherwise it will load posts until they are finished.
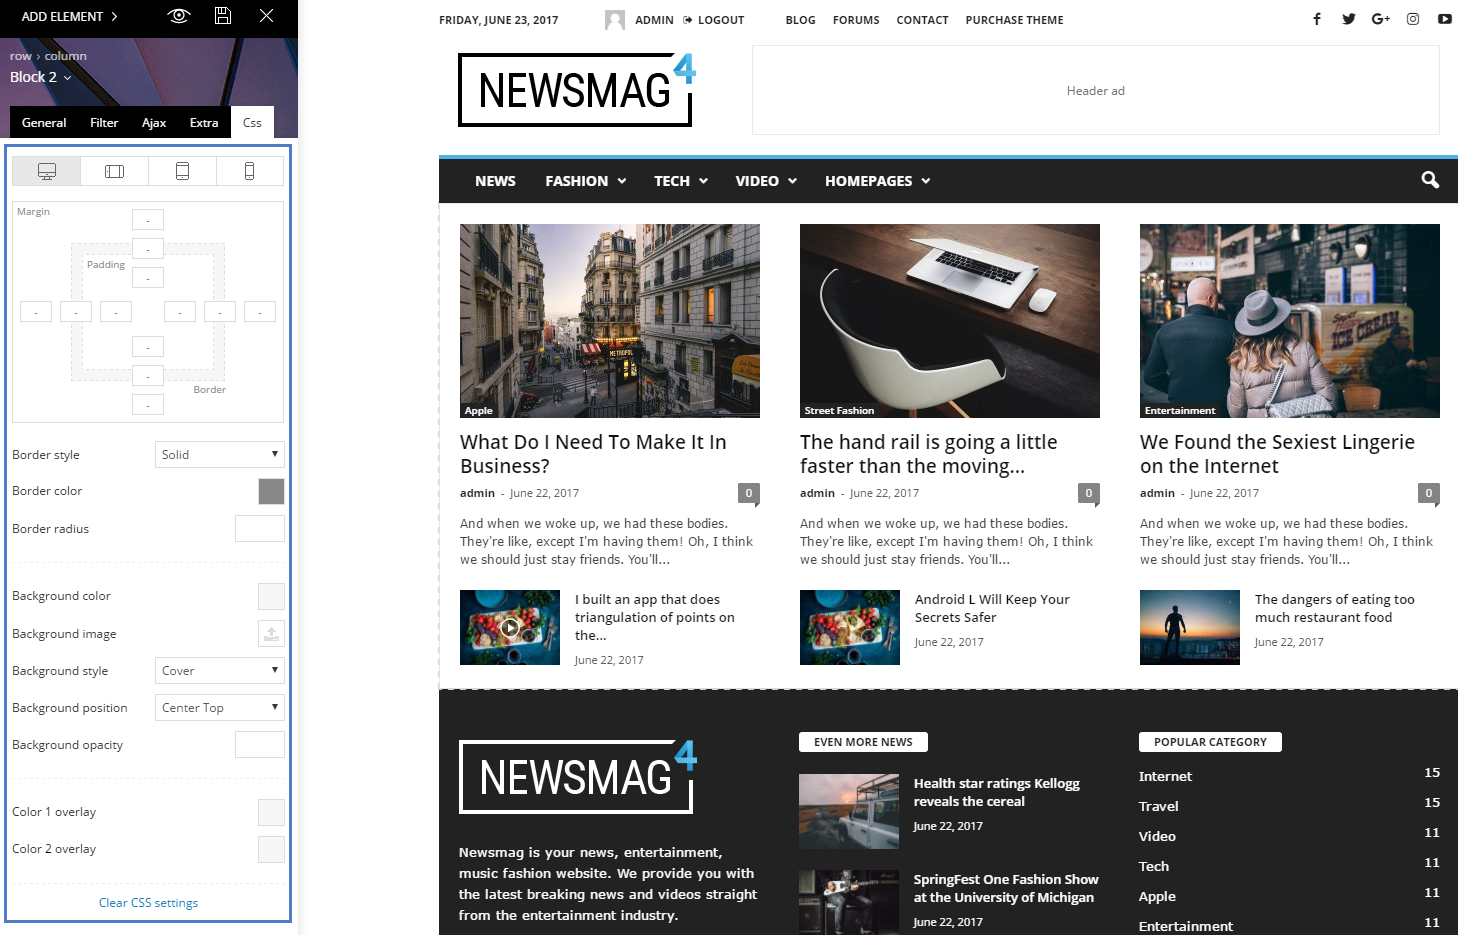
5. Css Tab:
The CSS tab provides multiple design options and grants you the possibility to customize the grid. It offers options for changing visual aspects like border style/width/color/radius, adding margins/padding, or customizing the grid’s background color/style, or just add an image as a background for your block.
Blocks and Big Grids are the primary tools for designing your website. Now you have the necessary information about how to style your site, manage to filter posts and sort them to display in your own creative way.


