
Installing the Plugins
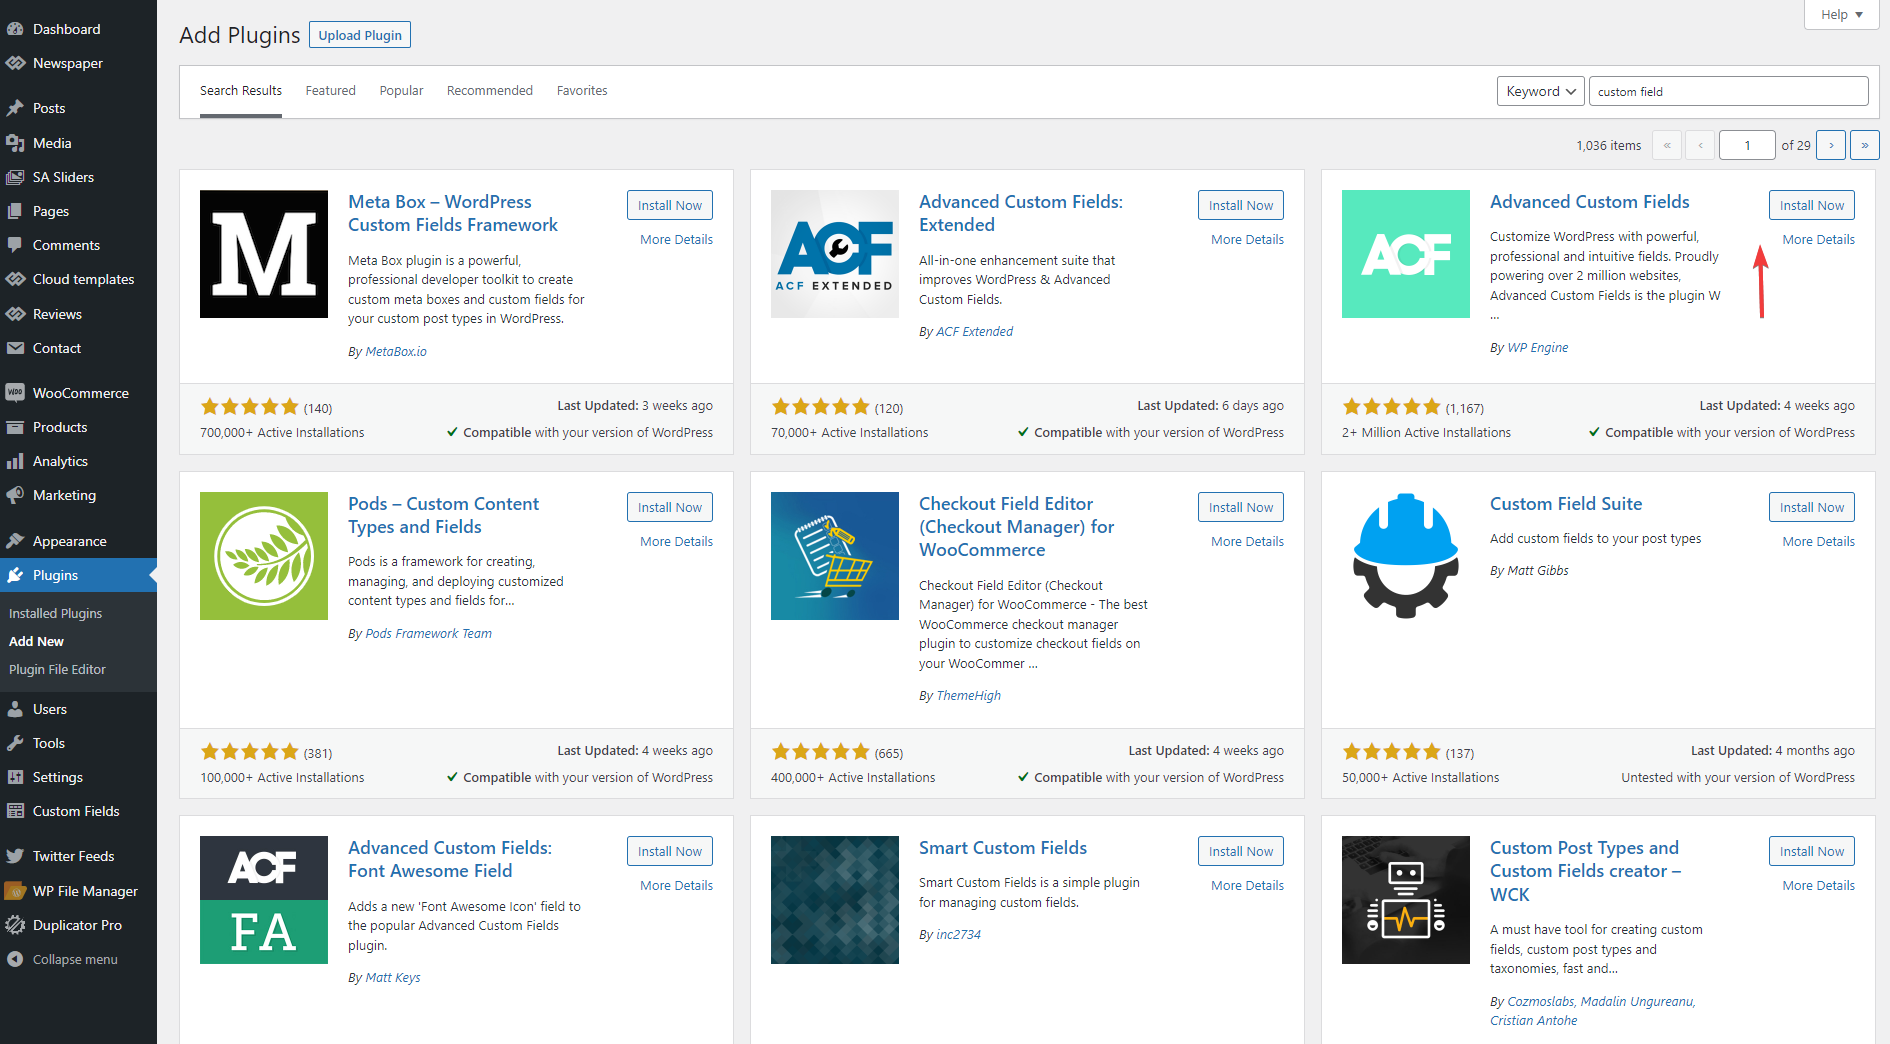
If you want to build a directory listing website with Newspaper Theme, you first need to install the following plugins: Custom Post Type UI and Advanced Custom Fields. Go to WordPress Dashboard > Plugins > Add New and search for them by name and install them.

Once installed, go to Plugins > Installed Plugins and activate them. Now you can create the beginning of your directory listing website.
Creating the Custom Post Type
First create your Custom Post, go to the CPT UI > Add/Edit Post Types. Create it by first naming it – what type of directory listing are you creating? Name it based on the type, for example, for a music directory you can name the custom post type Tunes. These 3 fields need to be filled in:

- Post Type Slug – is the URL form, it can have the same name as the label.
- Plural Label – if the name you chose was Tunes, have that inserted here. This refers to the plural of the word you chose.
- Singular Label – the name you chose only in singular.
Once you have these filled in, you need to click on Populate additional labels based on chosen labels so it can create the Custom Post Type based on the chosen names. You can scroll down until you see Settings – this list has a lot of additional ways you can modify your Custom Post Type, for the sake of keeping it brief, just keep scrolling until you see Supports.
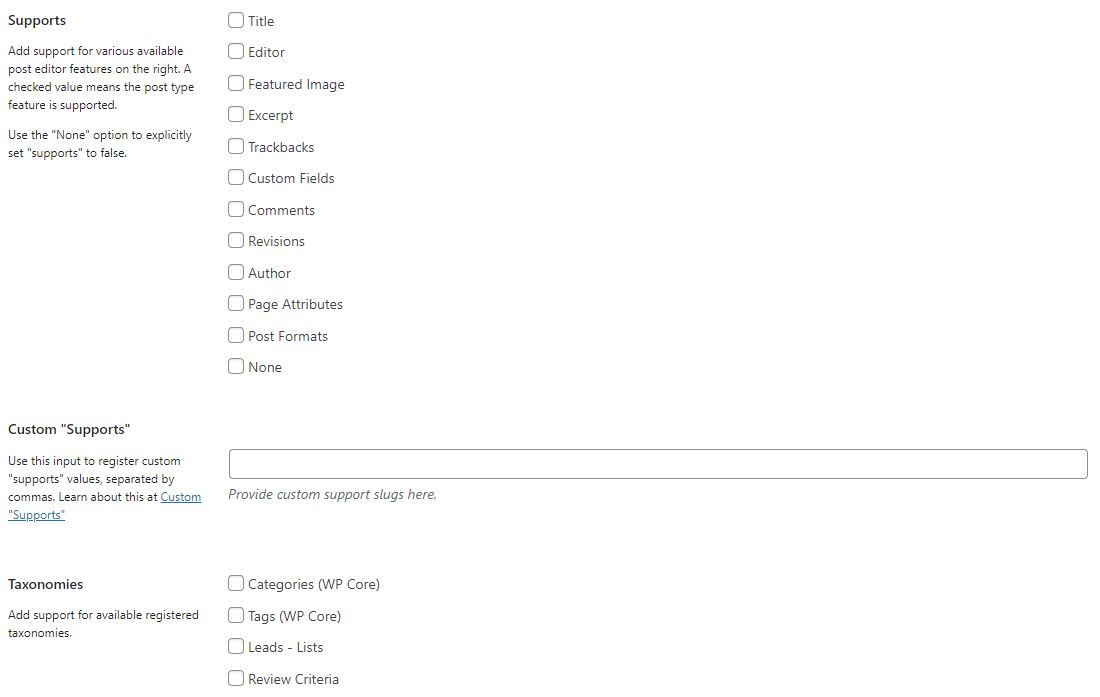
From the List above, you can choose what the Custom Post Type should have – a title, an author, comments, featured image, excerpt, editor, custom fields, etc. As an example, check off the following: Title, Editor, Featured Image, Excerpt, Custom Fields, and Comments.
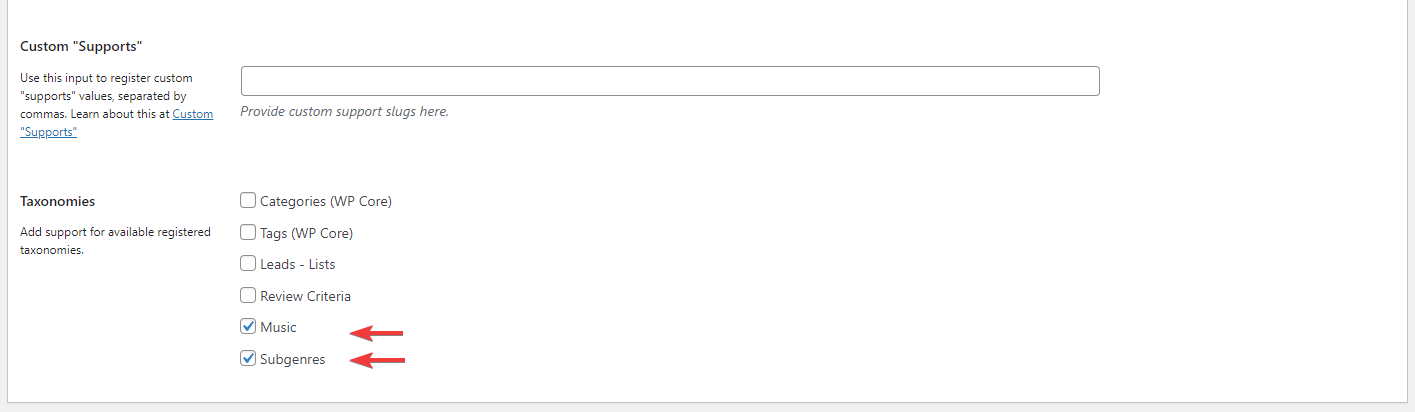
Now move on to the Taxonomies sections. This is where your taxonomies will show up once you create them. In order to link a Custom Post Type to a taxonomy you need to check off the box that applies to the taxonomy. For now leave it as it as we will come back to it soon.
Click the Save Post Type button at the bottom of the page to save your current settings and create your first Custom Post Type.
Creating the Taxonomies
Think of Taxonomies as custom Categories that can be attached to normal articles or even Custom Post Types. Go to CPT UI > Add/Edit Taxonomies to create your first Taxonomy. Now just like with the Custom Post Type, you need to fill in the slug and the label for singular and Plural.
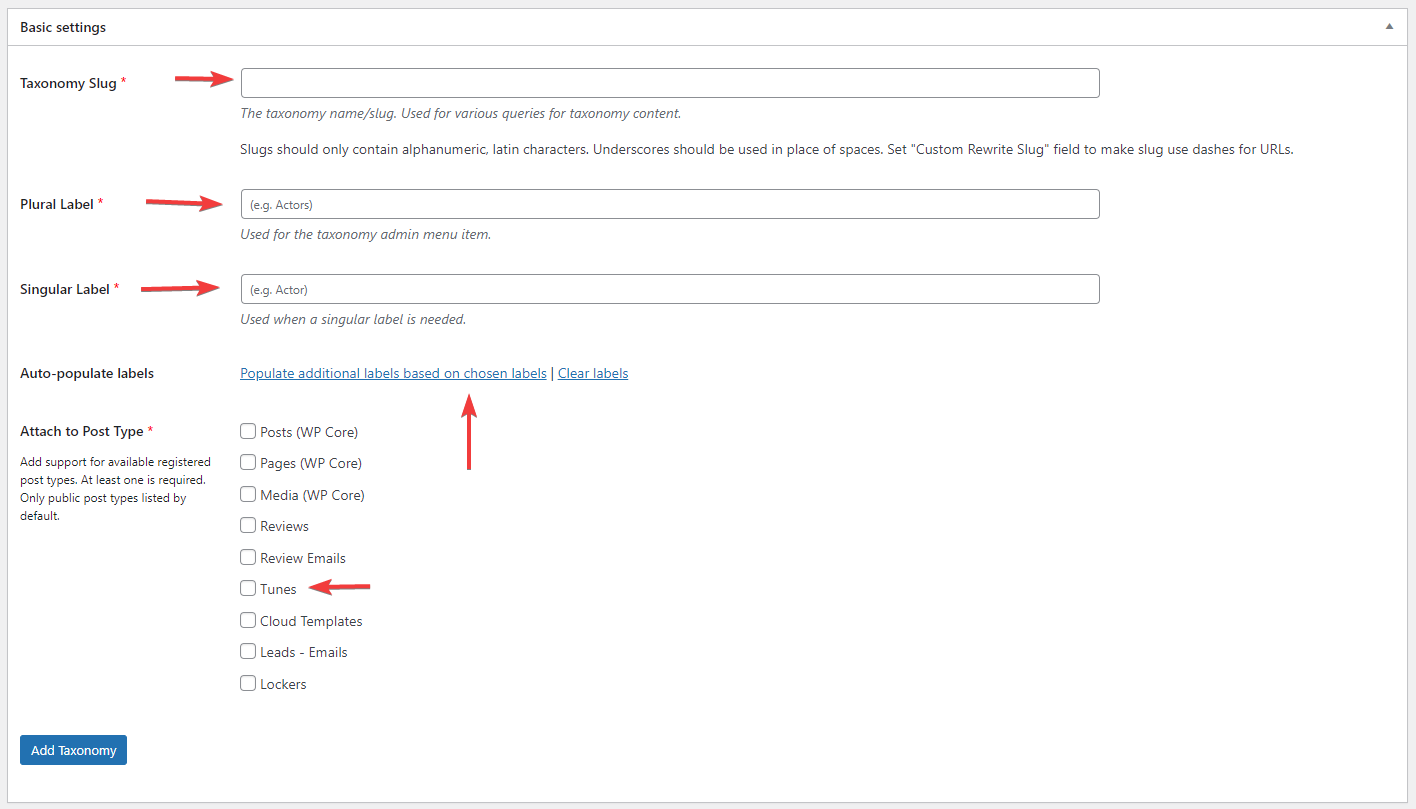
- Taxonomy Slug – the URL of your taxonomy.
- Plural Label – the plural of the name of your taxonomy. If you’ve named your Custom Post Type Tunes, you can name your Taxonomy Subgenres.
- Singular Label – the singular form of your taxonomy. For the purpose of this exercise, it would be Subgenre.
After you’ve filled in those 3 boxes, click on Populate additional labels based on chosen labels to insert it further down the page. Now if you’ve created your Custom Post Type, you can see it in the list here in Attach to Post Type list. Check it to attach the Taxonomy to it.
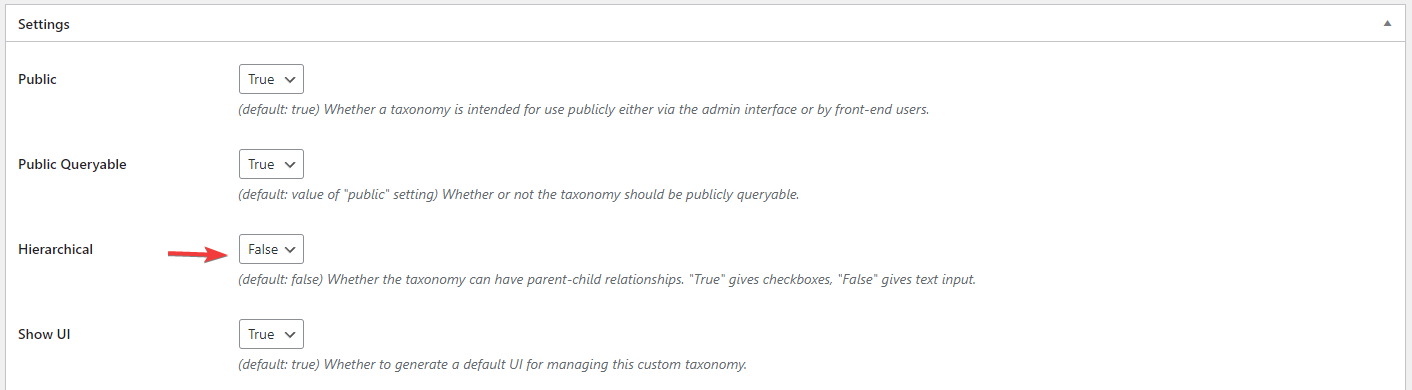
Now scroll further down the page until you see Settings. The first thing that should be decided now would be to see what type of hierarchy you want your Taxonomy to have. If you want to create Parent – Child relationships for your Taxonomy terms say you want to have a big category called Rock, then branch out into Alternative Rock, Melodic Rock, etc. You need to have the Hierarchical setting to True. However, if you want to have the taxonomy be like tags, you can leave it on False.
Now you can scroll down to the bottom of the page and hit the Add Taxonomy button to create your First Taxonomy. Before we move on, go to CPT UI > Add/Edit Post Types and go to the Custom Post Type you created. At the bottom of the page, make sure to check off Supports on your newly created taxonomy.
 Editing a New Custom Post Type
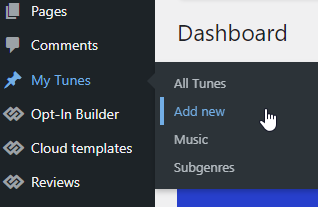
If you’ve been following along, you should now have your Custom Post Type added on the left Admin Dashboard with its currently assigned name. To create a new post, just go to Your Custom Post Type Name > Add New. For the purposes of this tutorial, we have created Tunes, so we go to Tunes > Add New.
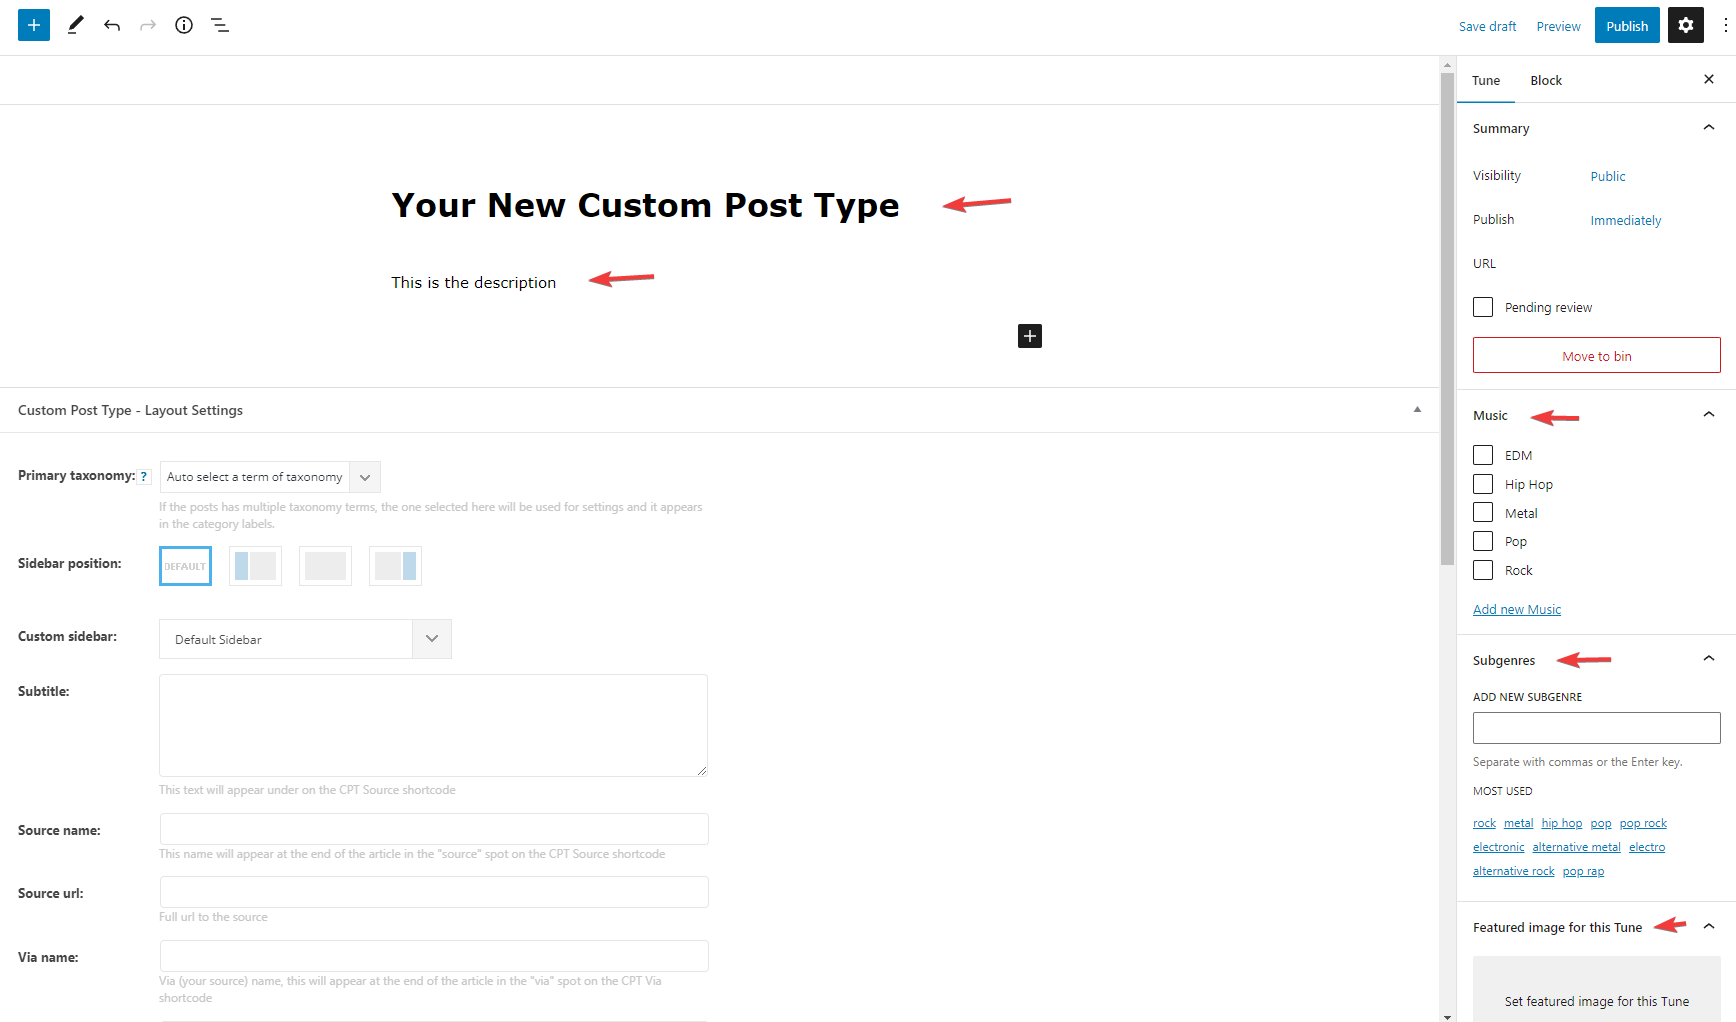
Based on the settings you checked off in the Supports column from the Settings tab of your Custom Post Type, you should now have them all available when you create a new Post Type like so:
Before you fill your directory listing website with content however, we should add some Custom Fields to your newly created Custom Post Type.
Adding the Custom Fields
Go to your Admin Dashboard > Custom Fields > Add New. Now you need to give your Field Group a name, this can be anything you want. For the purpose of this, we named ours Music Settings.

Now click on Add Field to create your first Custom Field. This will bring you further along the page and create a second Field.
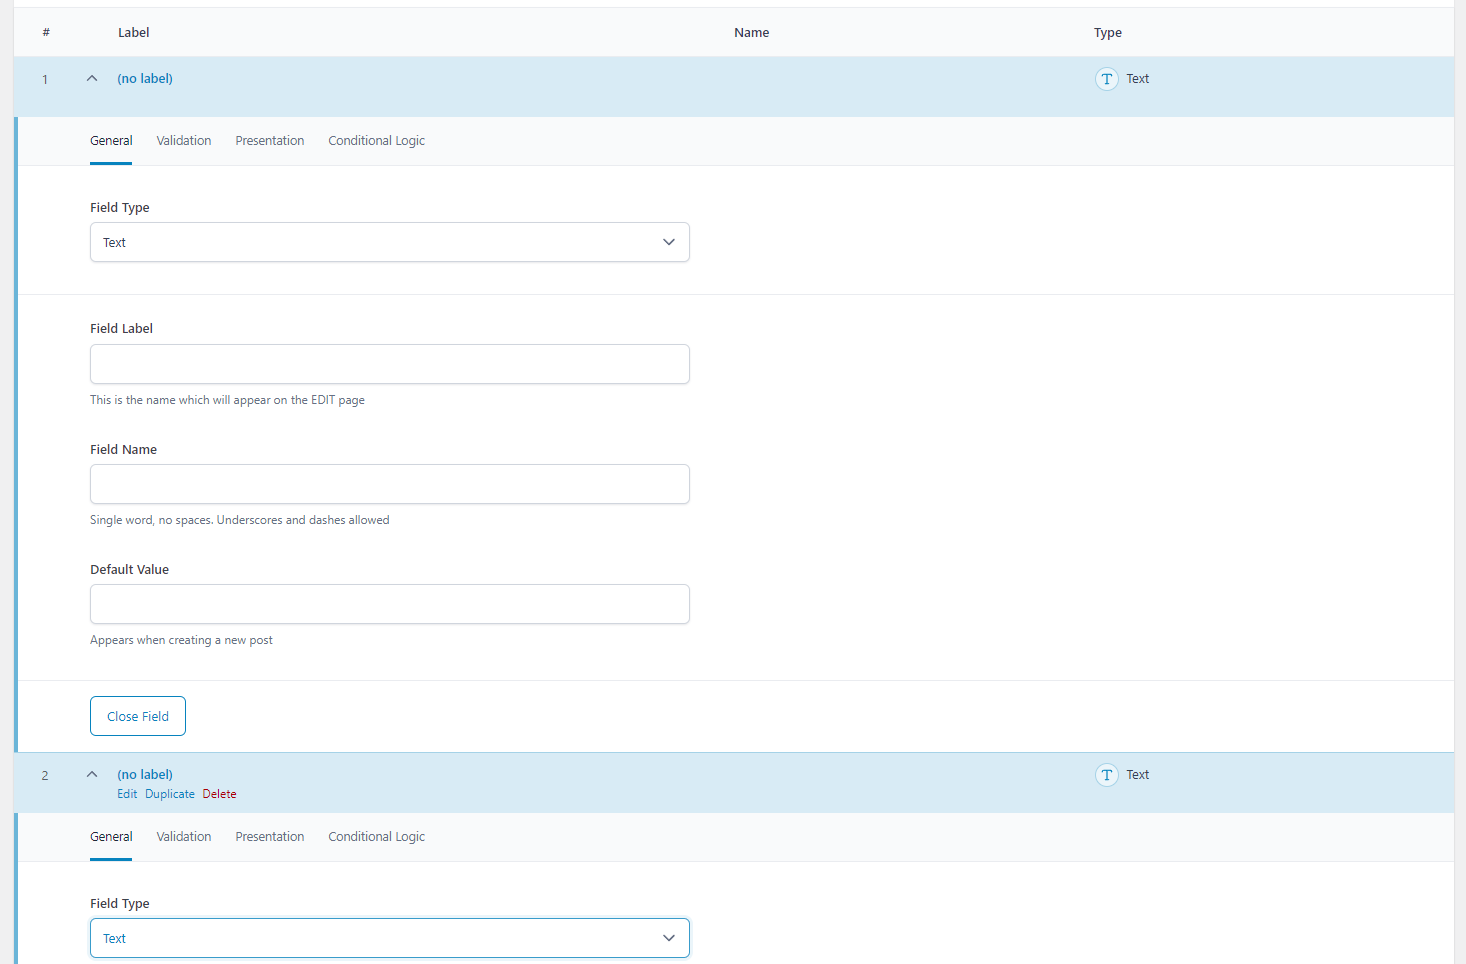
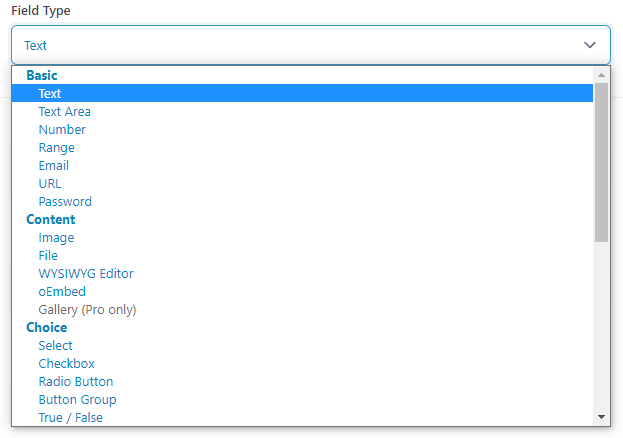
First your should choose what type of content this should be? What do you want to display? An icon for each of your Custom Post Types? An icon for your Taxonomies? A text field for your posts that displays the Track List of the album? As you can see from the dropdown menu you have a ton of options to pick from:
For the purpose of this tutorial, we have added a URL type of Custom Field named Artist Website so we can display the Album Artist’s website so visitors can check out where to buy the album from and see their other music.

We’ve also added a Custom Field that keeps track of the album’s Label so it can be displayed on the directory website.

There’s multitude of choices and settings you can add and display on your Post Type or Taxonomy. This Field group we’ve created however was intended to be displayed on the Post Type so we need to check that off. Scroll to the bottom of the page to see the Settings. Here you have Location Rules.
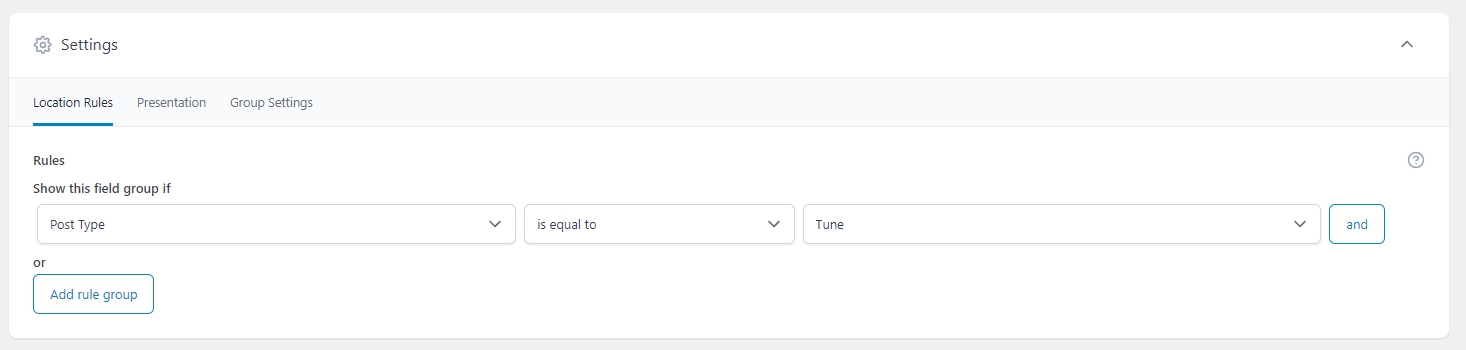
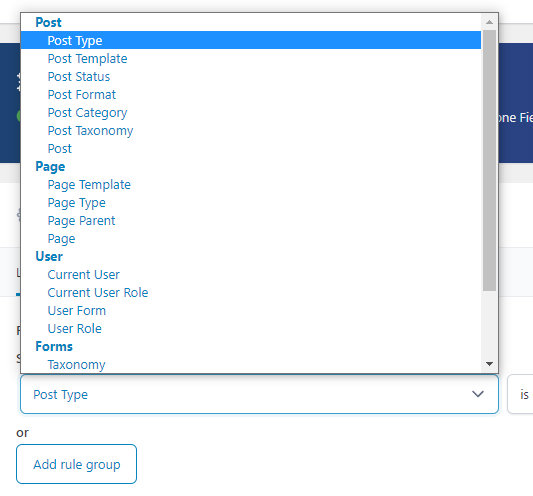
You can choose where exactly this Custom Field Group should be available by choosing an option from the Show this field group if dropdown menu.
We’ve chosen Post Type – Is Equal to – Tune. So it can be displayed on Post Type, and we’ve chosen Tune as this is the Custom Post Type we have just created. You can choose the Custom Field name you have created.
Now if you go to Your Custom Post Type > Add New you can scroll down and see how your Custom Field Group shows up when you create a Post Type.
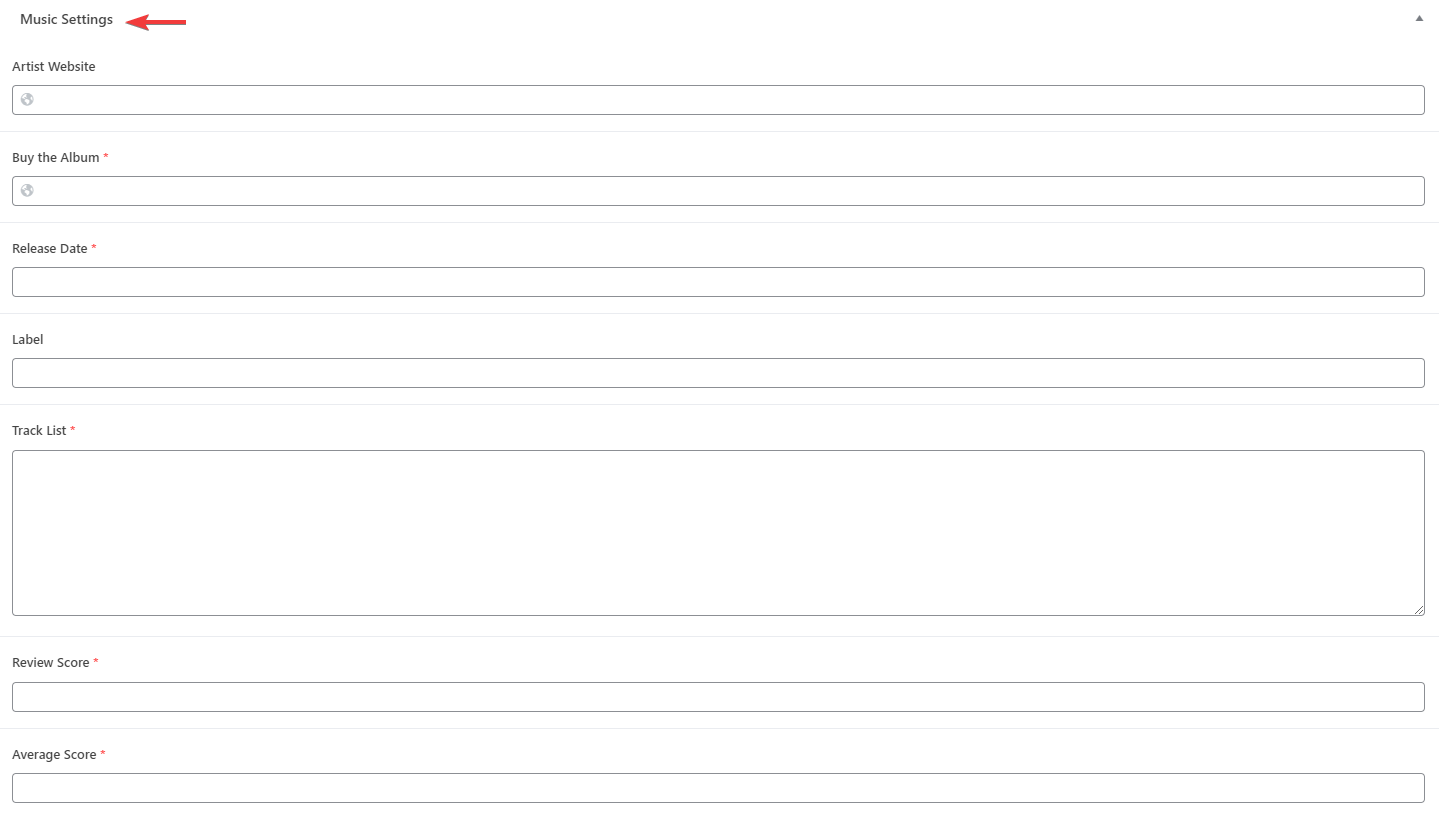
And you can fill in the extra information for each new Custom Post Type you create for your website. As you can see, our field group shows up, since we named it Music Settings and all of our custom fields are here, the Artist Website, Label, Release Date, etc. Those are all Custom Fields that can now be filled in.
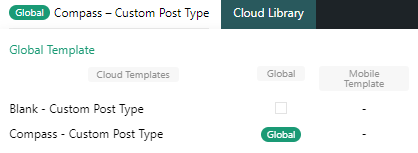
Custom Post Type Cloud Template
Now that you have your Custom Post Type, Custom Taxonomy, Custom Fields, and you can now create content for your website, you can now create your own Cloud Template to display your Custom Post Type. Go to Your Custom Post Type > All and then choose one and View it. At the top of your Admin Bar, click on the Cloud Library button to open up and import a Cloud Template. You can choose one of the already available templates, however they most likely require you to install a separate plugin that comes with them. For the purpose of this exercise, import the Blank Custom Post Type Template.
![]()
This will open up a Blank Template that you can drag and drop elements into. If you’re new to using the tagDiv Composer we highly suggest you read some of our other tutorials on it:
- tagDiv Composer Tutorial
- Add, Delete, Duplicate Rows in Newspaper Theme
- Installing a Prebuilt Website and Changing it to fit your Brand
- Our YouTube Video Tutorial Playlist
Please make sure to Save and then go back to your Custom Post Type. View it and then from your Admin Bar choose your new Blank Template either as Global or just click on its name to assign it to the current Post.
Now click on Edit with TagDiv Composer button. This will open up the front-end page builder. Click on Add, now you can see the new shortcodes available to you by scrolling down:
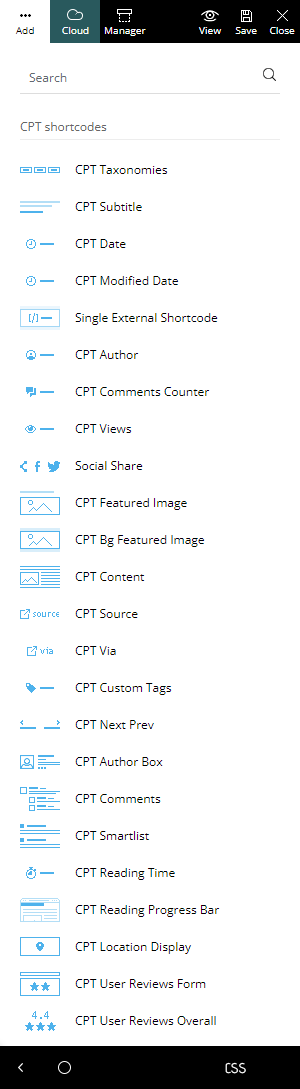 The Shortcodes with the CPT in front of them are meant for you to use with the CPT UI and ACF plugins. Each one is different and has a different job based on its name. Think of the layout you want to achieve with your Custom Post Type, how does it look? Drag and drop elements into the page that make sense for your desired layout.
There’s also the Custom Field shortcode which brings onto the page, the exact Field you need.
![]()
Just drag it onto the page and you should be able to choose the exact Field you need:

This will now display the exact Custom Field you want and you can begin editing it through the General and Style tab.
Keep adding elements onto the page, move them around, split rows into columns, change sizes, fonts, and colors to achieve the desired look. When you’re done, click save and you can then view your work.